無障礙功能
為什麼要有無障礙功能?
網路無障礙功能(又稱為 a11y)的概念是設計並打造所有人都能使用的網站。我們必須支援無障礙功能,才能使用輔助科技解讀網頁。
React 能完整支援無障礙網站的建構。這些網站通常都使用標準的 HTML 技術。
標準及規範
WCAG
網路內容無障礙功能指南(WCAG)提供了建立無障礙網頁的規範。
以下的 WCAG 檢查清單提供了概觀:
WAI-ARIA
這份網路無障礙功能倡議 - 無障礙網路應用程式文件包含了許多架設無障礙功能 JavaScript 的小工具。
請注意,所有的 aria-* HTML attribute 在 JSX 中都是支援的。相較於 React 中大部分駝峰式大小寫的 DOM property 和 attribute,這些 attribute 則應該像在純 HTML 中一樣使用帶連字符式寫法(又稱為 kebab-case、lisp-case 等):
<input
  type="text"
  aria-label={labelText}  aria-required="true"  onChange={onchangeHandler}
  value={inputValue}
  name="name"
/>
Semantic HTML
Semantic HTML 是無障礙網頁應用程式的基礎。使用不同的 HTML element 來加強網站中資訊的意義可以在不用花費的情況下讓所有人造訪你的網站。
有時候當我們新增 <div> element 到 JSX 讓 React 程式可以運作時,我們會違反 HTML 的語義,尤特別是在當我們處理列表(<ol>,<ul> 和 <dl>)以及 HTML 表格 <table> 的時候。
在這些情況下我們應該使用 React Fragment 將數個 element 組織在一起。
例如:
import React, { Fragment } from 'react';
function ListItem({ item }) {
  return (
    <Fragment>      <dt>{item.term}</dt>
      <dd>{item.description}</dd>
    </Fragment>  );
}

function Glossary(props) {
  return (
    <dl>
      {props.items.map(item => (
        <ListItem item={item} key={item.id} />
      ))}
    </dl>
  );
}
你可以使用 map 將一個 collection 中的每一個 item 與一個 fragment 相對應,就如同處理其他的 element ㄧ樣:
function Glossary(props) {
  return (
    <dl>
      {props.items.map(item => (
        // 當你 map 一個 collection 時,Fragment 也應該要有一個 `key` prop
        <Fragment key={item.id}>          <dt>{item.term}</dt>
          <dd>{item.description}</dd>
        </Fragment>      ))}
    </dl>
  );
}
如果你的 Fragment tag 不需要任何 prop,你也可以使用簡寫語法,如果你的工具支援這個語法的話:
function ListItem({ item }) {
  return (
    <>      <dt>{item.term}</dt>
      <dd>{item.description}</dd>
    </>  );
}
請參考 Fragment 文件了解更多詳情。
無障礙表格
標記
每一個 HTML 的表格控制,例如 <input> 和 <textarea>,都需要無障礙標記。我們需要提供敘述性的、能讓螢幕閱讀器識別的標記。
以下的資源讓我們知道如何標記:
雖然這些標準的 HTML 用法能直接在 React 中使用,請注意 for attribute 在 JSX 中是寫作 htmlFor:
<label htmlFor="namedInput">Name:</label><input id="namedInput" type="text" name="name"/>通知用戶錯誤訊息
錯誤發生的狀況需要被所有使用者了解。以下連結解釋如何讓螢幕閱讀器也能識別錯誤訊息:
焦點控制
確保你的網路應用程式能完全只用鍵盤操作:
鍵盤焦點和焦點輪廓
鍵盤焦點指的是目前在 DOM 中的 element 被選取以接受來自鍵盤的輸入。我們到處可以見到類似下面這張圖示內的焦點輪廓:

如果你打算用另一種方式做焦點輪廓,請使用 CSS 來移除這個輪廓,例如設定 outline: 0。
跳到指定內容的機制
請提供某種方式讓使用者可以跳過應用程式中的導覽部分,因為這樣可以協助加速鍵盤導覽。
跳過連結或跳過導覽連結是隱藏式的導覽連結,只有在鍵盤使用者與網頁互動時才會顯現。它們十分容易用內部頁面錨和一些 styling 做出來:
你也可以使用像 <main> 和 <aside> 這樣的 landmark element 和 role 來標記頁面上的區域,因為輔助科技會快速導覽使用者到這些區域。
在這裡你可以閱讀更多關於這些 element 增加無障礙功能的用法:
Programmatically managing focus
Our React applications continuously modify the HTML DOM during runtime, sometimes leading to keyboard focus being lost or set to an unexpected element. In order to repair this, we need to programmatically nudge the keyboard focus in the right direction. For example, by resetting keyboard focus to a button that opened a modal window after that modal window is closed.
MDN Web Docs takes a look at this and describes how we can build keyboard-navigable JavaScript widgets.
To set focus in React, we can use Refs to DOM elements.
Using this, we first create a ref to an element in the JSX of a component class:
class CustomTextInput extends React.Component {
  constructor(props) {
    super(props);
    // Create a ref to store the textInput DOM element    this.textInput = React.createRef();  }
  render() {
  // Use the `ref` callback to store a reference to the text input DOM  // element in an instance field (for example, this.textInput).    return (
      <input
        type="text"
        ref={this.textInput}      />
    );
  }
}
Then we can focus it elsewhere in our component when needed:
focus() {
  // Explicitly focus the text input using the raw DOM API
  // Note: we're accessing "current" to get the DOM node
  this.textInput.current.focus();
}
Sometimes a parent component needs to set focus to an element in a child component. We can do this by exposing DOM refs to parent components through a special prop on the child component that forwards the parent’s ref to the child’s DOM node.
function CustomTextInput(props) {
  return (
    <div>
      <input ref={props.inputRef} />    </div>
  );
}

class Parent extends React.Component {
  constructor(props) {
    super(props);
    this.inputElement = React.createRef();  }
  render() {
    return (
      <CustomTextInput inputRef={this.inputElement} />    );
  }
}

// Now you can set focus when required.
this.inputElement.current.focus();
When using a HOC to extend components, it is recommended to forward the ref to the wrapped component using the forwardRef function of React. If a third party HOC does not implement ref forwarding, the above pattern can still be used as a fallback.
A great focus management example is the react-aria-modal. This is a relatively rare example of a fully accessible modal window. Not only does it set initial focus on the cancel button (preventing the keyboard user from accidentally activating the success action) and trap keyboard focus inside the modal, it also resets focus back to the element that initially triggered the modal.
Note:
While this is a very important accessibility feature, it is also a technique that should be used judiciously. Use it to repair the keyboard focus flow when it is disturbed, not to try and anticipate how users want to use applications.
Mouse and pointer events
Ensure that all functionality exposed through a mouse or pointer event can also be accessed using the keyboard alone. Depending only on the pointer device will lead to many cases where keyboard users cannot use your application.
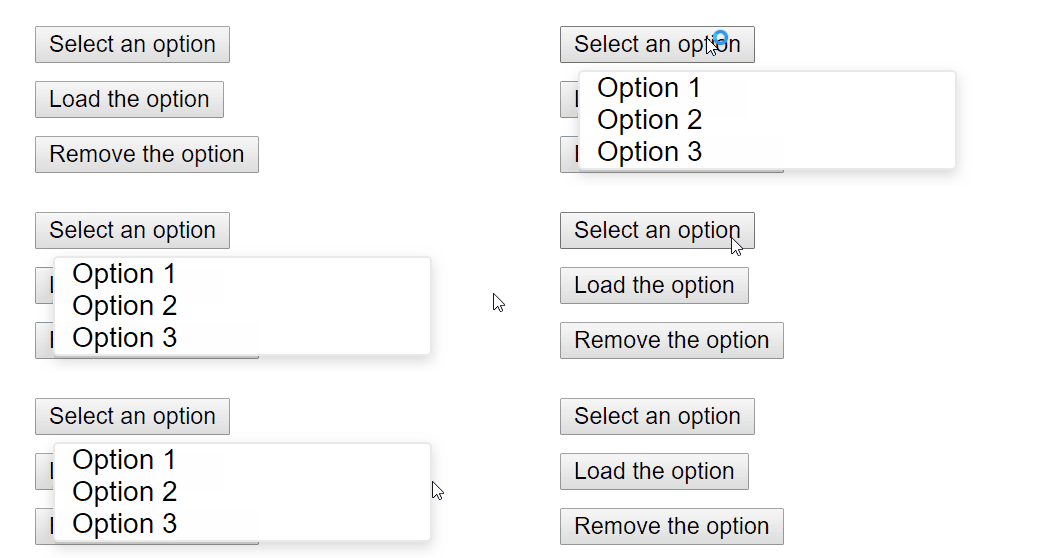
To illustrate this, let’s look at a prolific example of broken accessibility caused by click events. This is the outside click pattern, where a user can disable an opened popover by clicking outside the element.

This is typically implemented by attaching a click event to the window object that closes the popover:
class OuterClickExample extends React.Component {
  constructor(props) {
    super(props);

    this.state = { isOpen: false };
    this.toggleContainer = React.createRef();

    this.onClickHandler = this.onClickHandler.bind(this);
    this.onClickOutsideHandler = this.onClickOutsideHandler.bind(this);
  }

  componentDidMount() {    window.addEventListener('click', this.onClickOutsideHandler);  }
  componentWillUnmount() {
    window.removeEventListener('click', this.onClickOutsideHandler);
  }

  onClickHandler() {
    this.setState(currentState => ({
      isOpen: !currentState.isOpen
    }));
  }

  onClickOutsideHandler(event) {    if (this.state.isOpen && !this.toggleContainer.current.contains(event.target)) {      this.setState({ isOpen: false });    }  }
  render() {
    return (
      <div ref={this.toggleContainer}>
        <button onClick={this.onClickHandler}>Select an option</button>
        {this.state.isOpen && (
          <ul>
            <li>Option 1</li>
            <li>Option 2</li>
            <li>Option 3</li>
          </ul>
        )}
      </div>
    );
  }
}
This may work fine for users with pointer devices, such as a mouse, but operating this with the keyboard alone leads to broken functionality when tabbing to the next element as the window object never receives a click event. This can lead to obscured functionality which blocks users from using your application.

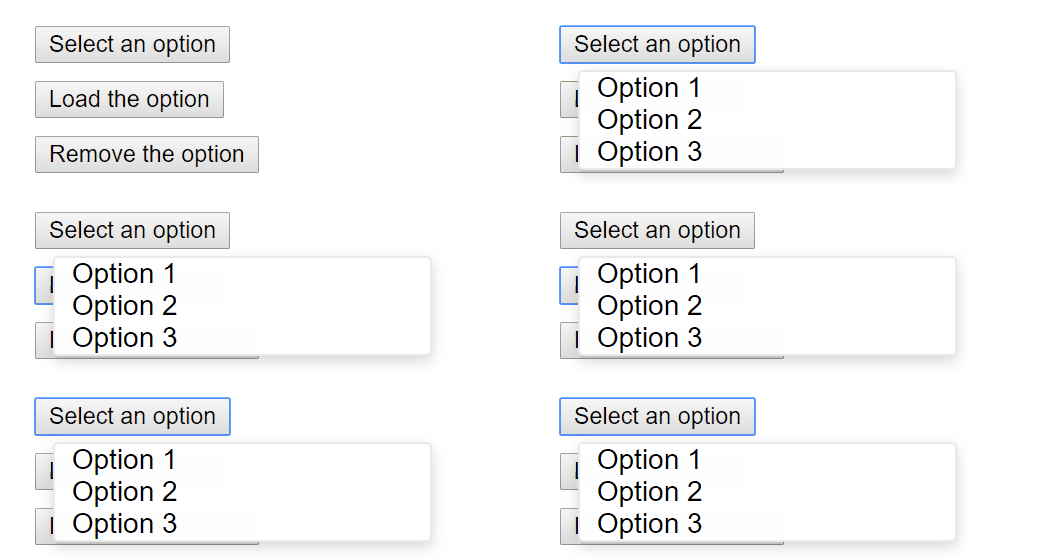
The same functionality can be achieved by using appropriate event handlers instead, such as onBlur and onFocus:
class BlurExample extends React.Component {
  constructor(props) {
    super(props);

    this.state = { isOpen: false };
    this.timeOutId = null;

    this.onClickHandler = this.onClickHandler.bind(this);
    this.onBlurHandler = this.onBlurHandler.bind(this);
    this.onFocusHandler = this.onFocusHandler.bind(this);
  }

  onClickHandler() {
    this.setState(currentState => ({
      isOpen: !currentState.isOpen
    }));
  }

  // We close the popover on the next tick by using setTimeout.  // This is necessary because we need to first check if  // another child of the element has received focus as  // the blur event fires prior to the new focus event.  onBlurHandler() {    this.timeOutId = setTimeout(() => {      this.setState({        isOpen: false      });    });  }
  // If a child receives focus, do not close the popover.  onFocusHandler() {    clearTimeout(this.timeOutId);  }
  render() {
    // React assists us by bubbling the blur and    // focus events to the parent.    return (
      <div onBlur={this.onBlurHandler}           onFocus={this.onFocusHandler}>        <button onClick={this.onClickHandler}
                aria-haspopup="true"
                aria-expanded={this.state.isOpen}>
          Select an option
        </button>
        {this.state.isOpen && (
          <ul>
            <li>Option 1</li>
            <li>Option 2</li>
            <li>Option 3</li>
          </ul>
        )}
      </div>
    );
  }
}
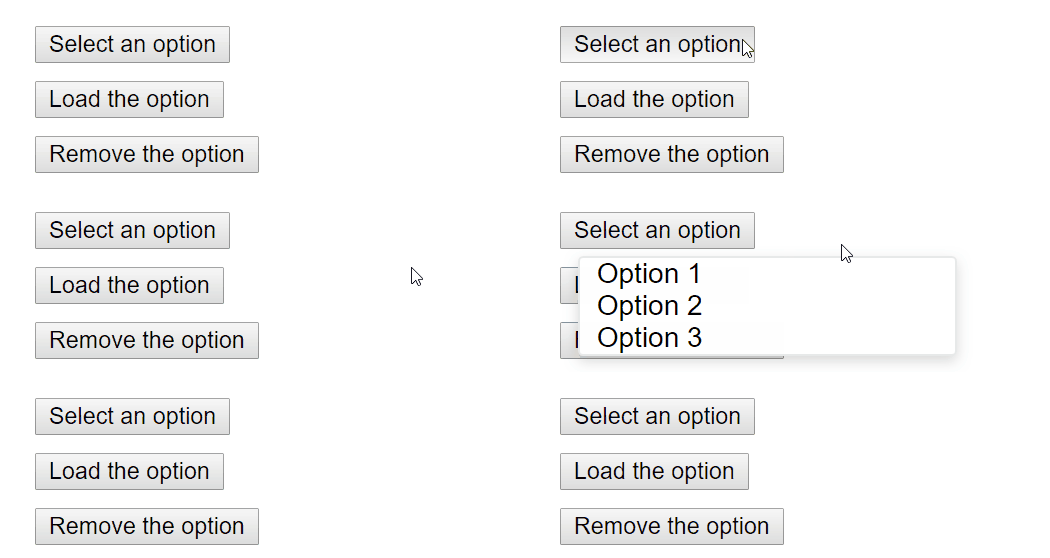
This code exposes the functionality to both pointer device and keyboard users. Also note the added aria-* props to support screen-reader users. For simplicity’s sake the keyboard events to enable arrow key interaction of the popover options have not been implemented.

This is one example of many cases where depending on only pointer and mouse events will break functionality for keyboard users. Always testing with the keyboard will immediately highlight the problem areas which can then be fixed by using keyboard aware event handlers.
More Complex Widgets
A more complex user experience should not mean a less accessible one. Whereas accessibility is most easily achieved by coding as close to HTML as possible, even the most complex widget can be coded accessibly.
Here we require knowledge of ARIA Roles as well as ARIA States and Properties. These are toolboxes filled with HTML attributes that are fully supported in JSX and enable us to construct fully accessible, highly functional React components.
Each type of widget has a specific design pattern and is expected to function in a certain way by users and user agents alike:
- WAI-ARIA Authoring Practices - Design Patterns and Widgets
- Heydon Pickering - ARIA Examples
- Inclusive Components
Other Points for Consideration
Setting the language
Indicate the human language of page texts as screen reader software uses this to select the correct voice settings:
Setting the document title
Set the document <title> to correctly describe the current page content as this ensures that the user remains aware of the current page context:
We can set this in React using the React Document Title Component.
Color contrast
Ensure that all readable text on your website has sufficient color contrast to remain maximally readable by users with low vision:
- WCAG - Understanding the Color Contrast Requirement
- Everything About Color Contrast And Why You Should Rethink It
- A11yProject - What is Color Contrast
It can be tedious to manually calculate the proper color combinations for all cases in your website so instead, you can calculate an entire accessible color palette with Colorable.
Both the aXe and WAVE tools mentioned below also include color contrast tests and will report on contrast errors.
If you want to extend your contrast testing abilities you can use these tools:
Development and Testing Tools
There are a number of tools we can use to assist in the creation of accessible web applications.
The keyboard
By far the easiest and also one of the most important checks is to test if your entire website can be reached and used with the keyboard alone. Do this by:
- Disconnecting your mouse.
- Using
TabandShift+Tabto browse. - Using
Enterto activate elements. - Where required, using your keyboard arrow keys to interact with some elements, such as menus and dropdowns.
Development assistance
We can check some accessibility features directly in our JSX code. Often intellisense checks are already provided in JSX aware IDE’s for the ARIA roles, states and properties. We also have access to the following tool:
eslint-plugin-jsx-a11y
The eslint-plugin-jsx-a11y plugin for ESLint provides AST linting feedback regarding accessibility issues in your JSX. Many IDE’s allow you to integrate these findings directly into code analysis and source code windows.
Create React App has this plugin with a subset of rules activated. If you want to enable even more accessibility rules, you can create an .eslintrc file in the root of your project with this content:
{
  "extends": ["react-app", "plugin:jsx-a11y/recommended"],
  "plugins": ["jsx-a11y"]
}
Testing accessibility in the browser
A number of tools exist that can run accessibility audits on web pages in your browser. Please use them in combination with other accessibility checks mentioned here as they can only test the technical accessibility of your HTML.
aXe, aXe-core and react-axe
Deque Systems offers aXe-core for automated and end-to-end accessibility tests of your applications. This module includes integrations for Selenium.
The Accessibility Engine or aXe, is an accessibility inspector browser extension built on aXe-core.
You can also use the @axe-core/react module to report these accessibility findings directly to the console while developing and debugging.
WebAIM WAVE
The Web Accessibility Evaluation Tool is another accessibility browser extension.
Accessibility inspectors and the Accessibility Tree
The Accessibility Tree is a subset of the DOM tree that contains accessible objects for every DOM element that should be exposed to assistive technology, such as screen readers.
In some browsers we can easily view the accessibility information for each element in the accessibility tree:
- Using the Accessibility Inspector in Firefox
- Using the Accessibility Inspector in Chrome
- Using the Accessibility Inspector in OS X Safari
Screen readers
Testing with a screen reader should form part of your accessibility tests.
Please note that browser / screen reader combinations matter. It is recommended that you test your application in the browser best suited to your screen reader of choice.
Commonly Used Screen Readers
NVDA in Firefox
NonVisual Desktop Access or NVDA is an open source Windows screen reader that is widely used.
Refer to the following guides on how to best use NVDA:
VoiceOver in Safari
VoiceOver is an integrated screen reader on Apple devices.
Refer to the following guides on how to activate and use VoiceOver:
- WebAIM - Using VoiceOver to Evaluate Web Accessibility
- Deque - VoiceOver for OS X Keyboard Shortcuts
- Deque - VoiceOver for iOS Shortcuts
JAWS in Internet Explorer
Job Access With Speech or JAWS, is a prolifically used screen reader on Windows.
Refer to the following guides on how to best use JAWS:
Other Screen Readers
ChromeVox in Google Chrome
ChromeVox is an integrated screen reader on Chromebooks and is available as an extension for Google Chrome.
Refer to the following guides on how best to use ChromeVox: